Tuesday 27 May 2014

Autumn Rose

 
I've been working on a new mini album. Although this one isn't much of a mini album because of it's long size. The bonus is I can get some full 5 X 6 proper photos in it.

 
 I'm not too sure about the theme yet, but it will be Autumn-ish and of course vintage-y.

 
 Inside you can see how the paper bags cascade which is why the album is quite long. The paper bags will be covered in paper to match the idea of the theme and I'll decorate the pages with similar autumn inspired elements.

 
 Mister Simba doesn't care for it either way. He thinks I should open the front door so he can go out barking and chasing the stray cat who is sitting on the front steps ignoring him.

 
Now that I've gone and seen what Mister Simba was yapping about I've some more paper roses to make up for the album. And pages to decorate.
 
Hope everyone is having a good day or evening.
 

Sunday 25 May 2014

Workshop - Simple Living


On Saturday I attended the Simple Living workshop for haloumi, paneer and ricotta cheese. Ron and Jennylyn were our teachers and they gave a very good workshop on the three cheese types.


The recipes were easy to follow and something to follow up with at home. There was also a swap table before the workshop and I brought in five of the bonnet gals tea towels for swapping.

 
I came home with Gluten free banana muffins, which I didn't have any after my niece declared they were hers. I also scored one of Nanna Chels bird nest necklaces. Had to have those as I do like birdy things.


My bonnet gals must have been well liked because I didn’t bring any home.
The workshop was a great lesson and I look forward to the next one. You can read more about the workshop on the Simple Living Blog and at Nanna Chels blog .

I hope everyone is having a good day or evening where ever they are.

Wednesday 21 May 2014

pea and ham


Classic Pea and ham soup
 
Ingredients

290g (1 1/3 cups) green split peas
2 tablespoons olive oil
2 carrots, peeled, chopped
2 sticks celery, trimmed, chopped
1 brown onion, halved, chopped
3 garlic cloves, crushed
700g ham or bacon hocks
2L (8 cups) cold water
Salt & freshly ground black pepper

Method:
 
Rinse split peas under cold running water until water runs clear. Drain.
Heat oil in a saucepan over medium heat. Add carrot, celery, onion and garlic, and cook, stirring, for 5 minutes or until the onion softens.
 
Add split peas, ham hocks and water. Bring to the boil over high heat. Reduce heat to medium-low and simmer, covered, for 2 - 2 1/2 hours or until ham hocks are tender and the meat is falling away from the bones. Set aside for 5 minutes to cool slightly. Remove ham hocks from pan. Remove the meat from bones. Coarsely chop meat and return to pot. Stir until hot. Ladle soup into bowls.
 
Serve with crusty bread. Or served with toasted garlic bread, like we did. This soup freezes very well. Let cool first.


And if you have any room for dessert have a hot raspberry and apple crumble smoothered in hot custard. Perfect for a coolish autumn day.
 
I hope everyone has a good day or evening where ever they are.

Sunday 18 May 2014

Sunbonnet Sue

 
I finished up another kitchen set, this time it is a bit fancy with lace! The pattern is from a SunBonnet Sue Days of the Week...although I think she looks more of a Pairie gal, myself.
I'm still not sure if I want to add the flowers in the field at her feet but will likely do that. I left out the word bake day as I don't intend to do the whole set...yet.
 
 
I used applique and embroidery for this pattern. The gal's dress is from the old shirt I cut up and put to use.


I used basic embroidery stitchs through out. Her dress and hat is stem stitch in black. Lazy daisy (some more lazy than other's) for the flower petals and french knots for the flower center. I used variegated thread for the flowers in pink and yellow and plain green for the stems. Her arm I stitch stem stitch outline first then filled in with split stitch. The pie is done the same way with the outline but I used satin stitch as a variation.
 
By the end of the week I hope to have a few more friends of hers for surprises.
 
 
The dishcloths are simple double crochet. I used what thread I had at hand and mostly kept the colors related. You'll notice on the pink one I ran out of one color and just picked up another similar colour to finish.
 
 
And to finish up the set, I added the woven potholders that you'll no doubt remember. I later found out the pattern actually has a bonnet hat potholder to go with the set. I'll make that to add !
 
 
And here she is if you want to embroider her yourself. She's part of a Days of the Week set which I have saved on my pinterest GatheringGrace I have her and the others pinned on the sewing basket board (along with other sewing things too) . If you click on the image it will take you to a full size to save/print.
 
I hope that everyone is having a good day or evening wherever they are.

Thursday 15 May 2014

Woven potholder - Lesson


 Nanna Chel over at Going Grey and Slightly Green asked me in comments how I did the woven potholders, so without much ado here is a ...hopefully...simple lesson for all to try.


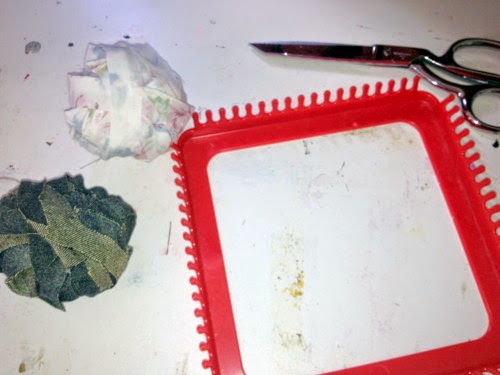
To begin with you will need a potholder loom. The one I use is by KLUTZ. You could easily make your own using an artist stretcher frame and some nails. I'm sure a google or pinterest search would give a good idea how to go about that. As well, some stiff cardboard with notches cut into the sides and tops can also be useable.
 
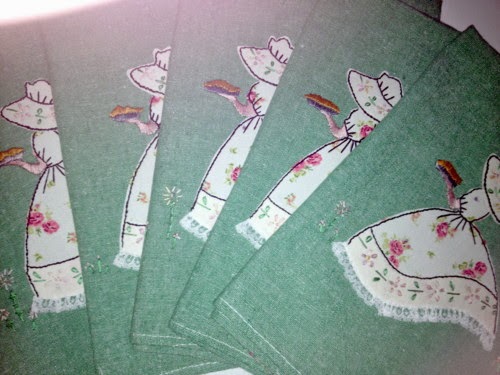
My loom makes about a 6 inch potholder when finished.
 
To begin with you will need to enough material for your weaving. In weaving terms the parellel threads (In this case fabric) is called the warp and the threads that run across (what you weave over and under) are called the weft.


Take your material that you have cut up in one long continuous strip. I do this by just cutting narrow strips going around and around the fabric until I've enough of a very long strip of fabric. Likely not the right way to do it but that's what I do. I think it should be properly cut on the bias to make a continious strip that doesn't fray as much. There's a video for preparing fabric strips on the bias: here
 
To start, tie the strip of fabric to one peg on the loom.
 
 
 Run this fabric called the warp, down, wrap around one peg at the bottom and come back up. At the top wrap around TWO pegs.


When you get to the end of your loom with your warp thread, tie the thread on ONE peg and cut the end, leaving a tail of fabric.

 
 Have enough weft fabric strip to weave your entire potholder. Start by going over and under your warp threads. Pull ALL the fabric through until you have some left at one end where you can tie it on one PEG. I usually begin next to where I ended my warp thread as this will now be the holder for the potholder when finished.

 
 When you weave your first row, your next row will be opposite of over and under. Remember to go around TWO pegs from now on until you reach the bottom where you will tie off around ONE peg.

 
 Once all your weaving is done, you will now need a crochet hook. One at a time lift off the loops around the two pegs with your crochet hook and make an edging of single crochet by drawing the crochet hook through the loops. If this is not clear enough instructions this youtube video of finishing a potholder loom will help as it is the same thing.

 
In this picture you can see the loops taken off the pegs and a crochet edging of single crochet is finishing off the potholder. When you get all the loops done, you will have two strips of material at the corner of the top to make a holder for your potholder.  At the bottom you will have to two strips as well where you ended, weave these in.


 And now, you're all set for some fancy cooking with your woven potholders.

This is how I do the woven potholders. As I learn more about the technique my method will likely change to make a better finish, but for now, this is the method I do.

Hope everyone has a good day or evening where ever they are.


Tuesday 13 May 2014

Simple pleasures


I've had some small finishes from the sewing basket today, and managed to at least finished up the cross-stitch I was doing. I've something planned for this little piece and hope to get to it at some point.

 
I also did two woven potholders and made a crochet dishcloth to go with them. I'm not really a lover of pink, but I like this sweet little set.

 
The shirt that I cut up and used with the woven pot holders also is finding it's way into other embroidery; like this sunbonnet gal WIP on  a dish towel to go with the dishcloth and potholders.
 
On my to finish list: The strippy quilt. Crochet granny square throw. A teapot luncheon cloth. A scrapbook mini album...And some where in this I want to try making cinnamon rolls. Of course I'd share the cinnamon rolls if I could...
 
I hope everyone is having a good day or evening.

Sunday 11 May 2014

Late Autumn

 
There was a couple of days where we did have a bit of a cold snap, and during that time it was good for making curried stew.
 
 
 There's nothing like a curried stew on cold days and they're a must during winter. Right now the weather is lovely and winter thoughts are far away.

 
But we at least managed to have a good stew for the season and as always with most stews we have a damper bread to go with it. Which is a bit like a over grown scone.

 
If you've ever had one cooked over hot coals or in a wood stove, you've eaten a proper damper. Just doesn't taste the same in today's stove's.
 
 
With the colder weather settling in I've been going through old clothes to clear out the cupboard. While I didn't have many clothes to clear out, the ones I saved I placed in the recycle bag and are now being made to use. A woven potholder like above is the start of a new project. The other material is for the string scrap quilt which is in progress.

 
The woven potholder uses an old shirt I had. It's amazing the amount of fabric that comes from clothing like this. I also save all the buttons, zips, and such. As well, when I cut the seams off the clothes I save those. You can use the seams for potholder hangers.
 
Have a good day or evening where ever you are.

Friday 9 May 2014

Australian Biscuit

I found this biscuit mixture in a vintage book called Australian Women's: Complete Household Guide Illustrated. It is a vintage book maybe late sixties(?) and appears to be a sort of Home Economics book with all sorts of helpful household information such as building a home, gardening, baby section, garden, crafts, sewing, cooking, jobs for teenagers, how to write letters and so on.... It may be dated in language but the common sense information still is good for today.
 
In the cookery section was this gem, which I had to try. I found it very easy and produced a good range of simple old fashioned biscuit I like. With my mixture I made some plain vanilla, jam drops, and peanut butter ones.
 
Foundation Biscuit Mixture
 
4oz. flour
¼ teaspoon baking powder ( You can use self raising flour and omitt the baking powder)
1 egg yolk
1 teaspoon water
2 oz. butter
2.oz. caster sugar
Flavoring
 
Preheat a moderate oven (200 deg.) and prepare one or two well greased trays. Cream the butter and sugar well and add egg yoke and flavouring. Add sifted flour, stirring with the back of a wooden spoon to a stiff dough. Turn on to a lightly floured board knead lightly and cut/shape into required shapes, place on a greased tray. Glaze with beaten egg white. Cook in moderate oven from 7-15 minutes according to biscuit combination.
 
Plain vanilla, lemon or orange or spice biscuits may be made from the above. Also almond fingers, date rolls, plain nut biscuits, ect.
 

Definetly a Granny recipe to keep and very good for the frugal home.

I hope everyone is has a good time with whatever it is you are doing.

Tuesday 6 May 2014

autumn moon

 
 With the cold snap we've been having it is easy to forget we're still in late autumn and winter is still to come. Either way it is good to stay indoors, even if today was rather splendid. 
 
Meanwhile, I've been working on some ideas for paintings and such. I've been doing some small-ish watercolour sketches for ideas for proper paintings.

 
The watercolour I treat more like I do acrylic paint but that doesn't matter to me. I'm not sure where I am going with these ideas, mostly just playing.


I like the folksy sort of art at the moment and these work in with the preference. I've always liked the moon too, so she always find a way in my art...somewhere.

 
And I like birds too. Like these two sisters seem to do.  At any rate it is good to have a play with paint brushes and paint too.
 
Hope everyone is having a good time, where ever they are.

Sunday 4 May 2014

Stencilled Recipe Cards

 These simple cards make a great gift to give away. Or you might want to keep them for yourself!
 
Ingredients needed:
Tsukineko memento inks in colours:
New Sprout
Cottage Ivy
Lady Bug
Or use you can use acrylic paint.
 
Dauber sponge to apply ink to card.
If you are using paint a stiff small paint brush is needed.
Card to use for the stencil. I used printing paper but you need a very sharp blade and a steady hand for cutting out as the paper tears easily.
  
Recipe card – 4x6 inches, with a plain back (You can make your own from recycled cardboard like I did)  I also covered the back of mine in recycled brown craft paper and the front has some pretty scrapbooking paper with a kitchen theme.
  
Felt tip pen for stem and leaves. I used a green felt tip pen.


Method:

Cut out the template supplied below at bottom of the post. The images are only small …about 1 1/2 inches in height. Cut only the part where you want to apply your ink, which is just inside the drawn outline.
 
 
Sponge in lightly a mix of Cottage Ivy and New Sprout over the stencilled pear shape. Build up Lady bug red to create the colour for the stencilled apple.
 
Using a green felt tip pen mark in leaves and stem of fruit as desired.
 
 
You can bundle these cards up in some raffia or ribbon to give as a gift. Maybe with a hand embroidered tea towel, or crochet dishcloth, or a wooden spoon as something extra.
 
 
I’m using mine in my newly ‘almost’ finished recipe box. The box is from the previous post showing how I made it up. I've only to decorate the top and figure out a proper closure to finish it all off. The closure I am currently using isn't working. But I'll figure it out eventually.
I wanted the recipe box to have a retro 1930-1940 theme and the paper packs I used has given the recipe box that look.


Below is the template for your fruit...just click on the image to go to larger size...to save or print (remembering they should be about 1 1/2 inches in height for your cards). Cut just inside the line to cut out the part you need to stencil. The stem and leaves for the fruit are drawn in freely with a green marker. You can also use the same marker to draw lines on your recipe card for writing out your recipes. 

 
There are of course lots of other ideas you can use this stencil for, but I hope this gives a good idea to begin with.
 
That's all. Have a good day or evening where ever you are.

Friday 2 May 2014

Rain days

What do you do when it is pouring down rain out side and it is better to stay indoors? First, I make a mad dash down to my 'gal shed' and find some cardboard I have stored up there... and then make a mad dash back up stairs just before the rain comes bucketing down.


The cardboard is just package stuff from things brought and most just toss out, I ask to keep it because I use carboard a lot for my projects. This box used to have solar lights in it. I cut it all down to size, scored and folded to get the startings of a box idea I want to do.

 
 So far, it looks like a box. I had to use some thinner cardboard to 'smooth' out those odd folds and such.
 
Looking out the window from my desk...yup, the rain is still coming down and did so for a long while and was heavy too. And no I didn't eat all of those chip packets, that's the thin cardboard I am using to smooth out the box, you can notice the big difference on the sides.
 
 
My box needed somehow to close the lid. I used for this, the plastic decoration found on those vintage crochet coat hangers...shh, don't tell mum I raided for it and pulled one of hers apart. At any rate, this box should be finished soon.


The button came from this cute little soap box I picked up at the markets long ago for $2. I didn't know what was in it until I got home and there's an awl and a collection of vintage buttons. You may remember my vintage camera, the button that is for the 'door knob' came from this box.
 
"Ken when to spend, and when to spare, and when to buy, and you'll ne'er be bare."
-Unknown.
 
I hope everyone has a good weekend where ever they are.